ส่วนแม่พิมพ์ มีส่วนประกอบ 2 ส่วนคือ
1.ยางซิลิโคน
มีลักษณะเหลวข้นเหมือนกาว
เมื่อเติมตัวทำให้แข็งลงไปจะทำให้แข็งตัวคล้ายยาง
แต่มีคุณสมบัติเหนือกว่า
ยางธรรมชาติคือ
รักษารูปทรงได้ดีกว่า
ทนความร้อนได้สูงกว่า
จึงเหมาะสมที่จะนำมาทำแม่พิมพ์
2.ตัวทำให้แข็งซิลิโคน
ลักษณะเหลวใส
ใช้ใส่ในซิลิโคนเพื่อให้ซิลิโคนแข็งตัว
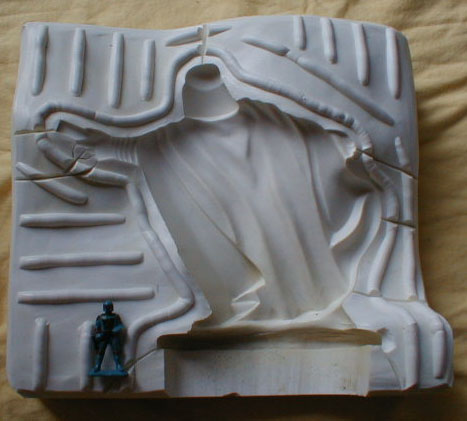
แม่พิมพ์
จะมีตั้งแต่แบบง่ายๆ
ที่เป็นแม่พิมพ์นูน2มิติ
ทำตัวติดตู้เย็นจนถึง
แม่พิมพ์ชนิดถก
แม่พิมพ์2ชิ้นที่ทำตัวตุ๊กตาที่มีรูปร่างเป็น
3
มิติเป็นต้น
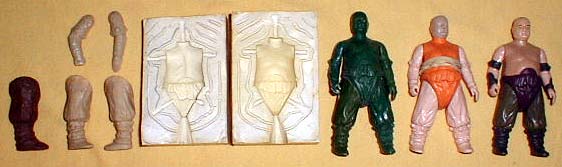
มีการใช้อุปกรณ์ดังนี้
- ต้นแบบที่ต้องการจะหล่อให้เหมือน
- ซิลิโคนและตัวทำให้แข็ง
- พู่กัน สำหรับใช้ทาซิลิโคน
- ปูนปลาสเตอร์
- กรอบหล่อพิมพ์ครอบ ถ้าเล็กอาจใช้ขวดน้ำดื่มมาตัดให้เป็นทรงกระบอก หรือ ท่อเอสลอนดังภาพประกอบก็ได้ครับ
- ดินน้ำมัน ,
กระดาษทิชชู่
สำหรับการทำแม่พิมพ์มีขั้นตอนดังนี้
- ยึดตนแบบไว้กับแผ่นวัสดุเรียบ
อาจใช้กาวก็ได้
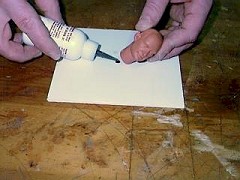
- เท ซิลิโคน
ลงในถ้วยผสม
ผสมตัวทำให้แข็งลงไป
2-5 %
คนเข้ากัน
แล้วใช้พู่กันทาไปบนต้นแบบ
โดยให้เลยมาถึงฐาน
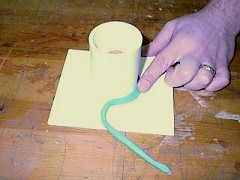
เป็นปีกเล็กน้อย ทาทับเป็นชั้นๆจนซิลิโคนเริ่มแข็งจึงหยุดทา ปกติจะทาให้หนาเพียง 1 มม.ก็พอ ทิ้งให้ซิลิโคนให้แข็งตัว
3 ชั่วโมง หรือ อาจทาทับเบื้องต้นให้ซิลิโคนเคลือบบางๆ แล้วจึงเทราดยางซิลิโคนลงบนต้นแบบตรงจุดสูงสุด แล้วคอย
ใช้ไม้หรือพู่กันคอยปาดส่วนที่ไหลลงมาให้ขึ้นไปบนต้นแบบให้ได้หนาที่สุด (สำหรับตุ๊กตาตัวเล็กๆใช้ซิลิโคน60กรัม ต่อ
ตัวทำแข็ง 18-25 หยดก็พอ) - นำกรอบหล่อพิมพ์
(ท่อเอสลอน
หรือ
ขวดน้ำดื่มมาตัด)
มาครอบ
อาจใช้ดินน้ำมันอุดรูรั่วตรงรอยต่อพื้น
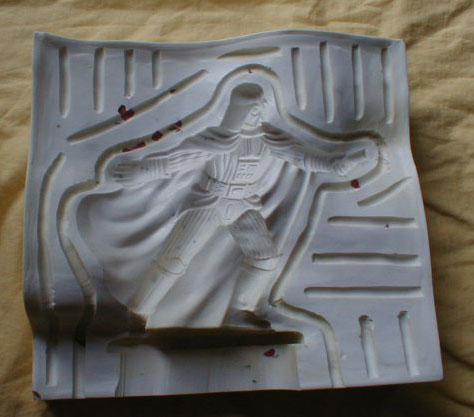
- ผสมปูนปลาสเตอร์กับน้ำ 2 :1 เทลงในพิมพ์ทับซิลิโคนที่เคลือบอยู่บนต้นแบบ ให้ท่วมต้นแบบหนา1-2 ซม.เพื่อเป็นตัวพิมพ์ครอบพยุงซิลิโคนทิ้งไว้จนปูนแข็งตัวจึงถอดกรอบหล่อพิมพ์ แกะเอาพิมพ์ครอบปูนปลาสเตอร์ออกไปตากแดดให้แห้งสนิท จึงนำมาประกอบกับพิมพ์ซิลิโคนตามเดิม
- นำไปใช้หล่อเรซิ่นตามต้องการ
หมายเหตุ
1. น้ำหนักยางซิลิโคน 50 กรัม ใช้ตัวทำแข็ง ประมาณ 2 ซี.ซี.
2. ของฝรั่งไม่ประหยัดซิลิโคนก็จะเทซิลิโคนไปบนต้นแบบเลย ไม่ต้องทา + ไม่ต้องหล่อปูนปลาสเตอร์ทับ
3.ถ้ากรณีวัสดุแง่มุมมากอาจใช้แม่พิมพ์2ชิ้น การทำแม่พิมพ์นี้ถือเป็นศาสตร์ที่ควรศึกษาเพิ่มเพราะสามารถ
ดัดแปลงใช้กับงานศิลป เยอะมากครับ (สังเกตดีๆ พิมพ์2ชิ้นจะมีการล็อคไม่ให้พิมพ์เลื่อนโดยการทำให้เว้า
นูน-ตัวผู้ตัวเมียล็อคกันพอดี)
เอาตัวอย่างของฝรั่งมาให้ดูอีกแบบนึงครับ-ว่างๆจะแปลอีกทีครับ
How to Create a Seamless Head Mold
Step
1:
We
are going to show you a simple way to make a one piece mold with virtually
no seam using Dow Corning's HS III silicone mold making rubber. We
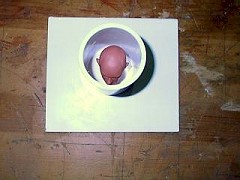
accomplish this by gluing the man's neck to a piece of plastic. He
will now be standing straight up.
 Step
2:
Step
2:
Cut
a section of a PVC pipe, plastic container (yogurt, etc.), or any other
mold making material that will fit around the head without touching any
part of him. You are looking for approximately 1/3 to 1/4 inch gap
between any part of the mold frame (PVC pipe) and the head.
Step
3:
Once
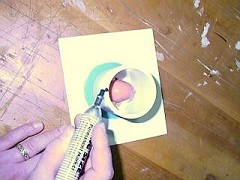
you have a container that fits around the head without touching him, spot
glue it in place using super glue. You don't need to glue it all the
way around because next you will seal the mold frame to the plastic base
using Alumilite's Molding Clay. Roll the clay out and press it on
the outside of the PVC pipe/mold frame and base plastic.
Step
4:
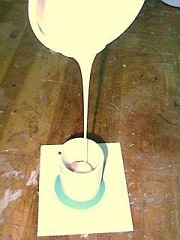
Once
the mold frame is sealed all the way around the pipe with clay, you are
ready to pour the silicone.
 Step
5:
Step
5:
Hint:
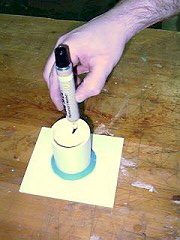
You may wish to mark the PVC pipe or mold container with a marker to show
which side is the back of the man's head. This will help you
determine what side of the mold you will cut to remove the master and the
cast pieces.
 Step
6:
Step
6:
Use
Dow Corning's HS III Silicone Rubber to make the mold. HS III has
excellent flexibility and tear strength to allow the maximum number of
releases per mold. Mix the silicone thoroughly and pour it into the
mold.
Step 7:
Allow
the rubber to cure for at least 24 hours at room temperature.
 Step
8:
Step
8:
Before
removing the silicone from the mold frame, make a mark on the silicone
(same spot as on the pipe) as to reference the back side of the head.
This will show you where you need to cut. After you have poured the
silicone and allowed the silicone to completely cure, scrape away the clay
and remove the plastic base by breaking the super glued sections. To
remove the silicone from the PVC pipe you may wish to use rubbing alcohol
down the inside of the mold box (PVC pipe). This will allow the mold
to slide out easier.
 Step
9:
Step
9:
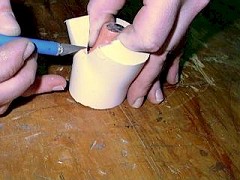
Once
you have removed the silicone from the pipe cut out, take a scalpel or
sharp knife and cut the silicone, starting at the neck, down the back of
the head until you get to the middle of the head as shown in the picture
below. Cut the silicone just enough to be able to stretch the
silicone and remove the master from the mold.
Step 10:
Before
casting a piece, put a small piece of tape around the seam to prevent it
from moving and leaking while you cast. The only seam that will show
is a small line in the back of the man's neck that goes up to the lower
portion of the back of his head. This type of mold will leave no
seam in any cosmetic area.